Sewing Machine Maintenance Tips and Tricks: Maintaining a sewing machine
- Heidi Sapere

- Sep 2, 2025
- 6 min read
If properly cared for, understanding the top sewing machine maintenance tips and tricks can make your machine last for many more years. Regular maintenance keeps your machine running smoothly, prevents costly repairs, and ensures your sewing projects come out perfectly. Whether you are a beginner or an experienced sewer, understanding how to maintain your sewing machine is essential. This guide will walk you through the steps and offer expert advice on keeping your machine in top condition.
Why is maintaining your sewing machine important?
To keep it out of the shop and avoid a costly bill! Nowadays, if a sewing machine needs to be worked on, it will run you at least $130. I know that the Napa Sew and Vac on Solano in Napa, California, if he doesn't have to open up the machine, it will cost you $50 to fix. That's a deal!
What's involved in the routine checks and care practices that help avoid common problems, such as thread jams, uneven stitches, or machine breakdowns, to keep a well-maintained machine performing better, sewing faster, and producing higher-quality results? Keep reading.
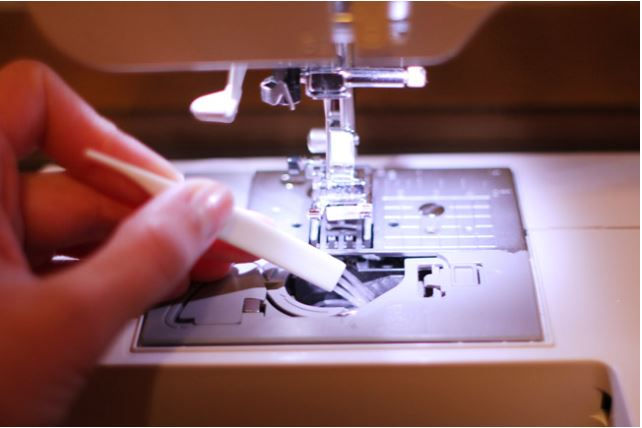
MOST IMPORTANT! Remember to clean under your stitch plate after every six to eight hours of sewing.
Unscrew the one or two screws that keep the plate on the sewing machine in place. The stitch plate is located right under the needle and presser foot. Also, if possible, remove the bobbin case and clean the dust underneath all around the crevices with a small brush. Make-up, small paint brushes, and the brush with your sewing machine work well. Dust and lint can accumulate inside the machine, especially around the bobbin case and feed dogs. This buildup can cause the machine to skip stitches, have thread tension issues, and make strange noises. Regular cleaning removes these obstructions.
SECOND IMPORTANT! The needle must be checked and replaced regularly after 8 hours of use, or if you hear it nicking the fabric.
If using Chrome or titanium needles, you can get away with using the needle longer since Chrome and titanium are stronger metals. Using a dull needle can damage fabric, cause thread breakage, and mess up the tension on your machine. In addition, use the correct type of needle for the fabric. For beginners, as long as the universal needle is working and not breaking or causing tension issues, there is no problem. As you get more advanced and understand the differences in needle types, you'll become more aware of what needle to use beyond the Universal: Stretch, Top Stitch, and Denum needles, for example. In my Basics 101 workshop, I give you a booklet with needle-type information and go through the main needles used on the machine.
More Best Practices for Maintaining a Sewing Machine
Use the correct thread and fabric
Poor-quality thread or incompatible fabric can cause tension issues and thread breakage. Always use good-quality thread; an easy rule is to match the needle and thread to your fabric type. Cotton thread with cotton fabric, polyester thread with polyester fabric. However, this is not a set fast rule, as many "universal" threads are polyester and work fine, as long as the thread isn't breaking. Here's more information about different threads in my two blogs: Top 2 Sewing Threads: Cotton and Polyester, and Top 3 Sewing Machine Thread Brands.
Keep the machine covered
When not in use, cover your machine with a dust cover, cloth, or even a piece of fabric to prevent dust accumulation that can get inside the gaps, such as the thread path. There are also many YouTube videos on how to make one, and there's the Sewing Machine Caddy Cover workshop I teach.

Machine Cover Caddy with Fabric Scissors, Toolkit Booklet, and Sewing Journal Check tension settings
Incorrect tension can cause puckering or loose stitches. Remember to test your stitch tension on scrap fabric before starting a project and adjust as needed. The usual tension on a sewing machine is #4 or between #3 and #5 if it needs adjustment. Adjusting the tension can be necessary when quilting or dealing with heavier fabrics. *Side note: Sometimes, when stitching heavy fabric or top stitching/quilting, the stitch length should be adjusted from 2.5 to 3.0 for better results.
Follow the manufacturer's manual
REMEMBER! Every machine comes with one. Learn to read your manual and understand what's inside. Each sewing machine manual has maintenance instructions. Your manual provides guidance on cleaning, oiling, and troubleshooting.
Incorporating these tips and tricks into your sewing will reduce the risk and headache of mechanical issues, allowing you to enjoy a smoother sewing experience.
What needs to be oiled on a sewing machine?
Read and see if your manual says to oil it. Older machines and Berninas need to be oiled, but newer machines don't always need regular oiling.
If your machine needs to be oiled, don't miss it! Oiling your sewing machine will be a crucial part of maintenance that keeps the moving parts lubricated and prevents wear.
If your machine does need oil, here are the key areas to focus on:
The shuttle race: This is the area where the bobbin case sits. It often requires oil to keep the hook mechanism moving smoothly.
Moving joints and levers: These parts benefit from a drop of sewing machine oil to reduce friction.
The needle bar and presser foot bar: Light oiling helps maintain smooth vertical movement.
Use only lightweight sewing machine oil, which is designed for this purpose. Avoid household oils, as they can gum up the machine and cause it to be placed in the shop.
Apply oil sparingly - a drop or two is enough. After oiling, run the machine on scrap fabric to distribute the oil evenly and wipe away any excess.
Regular oiling and cleaning will keep your machine running quietly and efficiently for years.

Troubleshooting Common Sewing Machine Problems
Even with good maintenance, you may encounter issues. Here are some common problems and how to fix them:
Thread bunching or birdnesting usually means the bobbin is inserted incorrectly or the tension is off. Re-thread the machine, check the bobbin placement, and see if your tension dial has moved from the "auto" setting.
Skipped stitches: Replace the needle and ensure it is inserted correctly. Also, check that the needle matches the fabric type and that if you changed feet, the right foot is on the machine.
If the machine is not feeding fabric: Clean the feed dogs and remove the presser foot. Secondly, check whether it's in the "free motion"—feed dogs down—position.
Machine making unusual noises:
Clean and oil the machine if it needs oiling.
Remove the bobbin case and bobbin to reinsert them.
Re-thread your machine.
Change the needle and check to see if the needle is loose.
Check and see if the screw next on the foot shank is loose.
Check if there's any thread stuck under the bobbin or bobbin case.
If the noise persists, consult a professional.
For more detailed help, you can hire me for a troubleshooting session.
How to Store Your Sewing Machine Properly
Proper storage is just as necessary as regular maintenance. Here are tips to keep your machine safe when not in use:
Cover the machine: When moving it, use a dust cover, case, or cover caddy to protect it from dust, moisture, and bumps.
Store in a dry place: Avoid damp or humid areas that can cause rust. Also, if the machines are computerized, it's best not to store them in very high temperatures, such as an attic.
To prevent loss, keep accessories organized: Store needles, bobbins, and tools in a dedicated box. I also teach two sewing tool organizing workshops: The Toolkit Booklet and Basket Box Caddy. In the beginning, sewing your own organizing containers is another great and rewarding way to learn how to sew.
Clean up your sewing space: My mom always taught me to clean my space every night before bed. I can't tell you how many times I've found that seam ripper or snips I couldn't see all day under something unexpected. *Hint: I always try to wear an apron when sewing to keep the most essential tools with me. The Over Easy Apron I designed is a great and easy apron to learn.


Reevaluate your space: Every three, six, or twelve months, go through your sewing room and ensure everything is as organized as possible. If necessary, add more organization and remove stuff (including fabric) you no longer use.
By storing your sewing machine and tools carefully, you ensure everything stays in excellent condition, you can find your tools, and be ready for your next project.
Maintaining your sewing lifestyle is a simple yet essential practice that saves time, money, and frustration. With regular cleaning, proper oiling (if needed), and careful handling, your machine will deliver excellent results for years. Consider your machine's manual and use quality supplies for the best performance and outcome.
Happy sewing!


Comments